> ## Documentation Index
> Fetch the complete documentation index at: https://docs.minoa.io/llms.txt
> Use this file to discover all available pages before exploring further.
# Converting Calculations
> Optional guided flow to reshape common pre-sales calculations for absolute metrics and time-series tracking
**Conversion is optional.** Value realization does not depend on it—you can mark value as realized, use [monthly values](/pages/value-realization/measurements#how-time-series-inputs-work) on inputs, or edit calculations yourself (including with the AI Value Engineer) whenever that fits better than this guided flow.
**What conversion is for:** Many pre-sales calculations are expressed as a **relative** improvement (for example “X% gain over baseline”). Conversion is a **helper** that moves the most common patterns toward **absolute** tracking (“How many units per month after signing?”) and time-series entry. It does not cover every calculation shape; adjust remaining ones by hand or using the [AI Value Engineer](/pages/business-case/ai-value-engineer).
**What conversion enables:** For supported structures, it transforms static, percentage-based inputs into a shape
where you enter **actual metric values** each month and the system derives the real improvement. The original
percentage assumption is preserved in a **baseline** input in the calculation so you can still reason about the
starting point.
**When you might skip it:** If the model already uses current vs. future **absolute** values, or you prefer to
switch the “Future” input to [monthly values](/pages/value-realization/measurements#how-time-series-inputs-work)
without using the wizard, you do not need conversion.
## The conversion flow at a glance
After [creating your Value Realization Scenario](/pages/business-case/scenarios#value-realization-scenarios), you may see an indicator on use cases showing which calculations **can** use the guided conversion flow. Using it is straightforward when you choose to:
1. Open the conversion tool
2. Review each calculation and its suggested metric
3. Confirm or adjust the metric selection
4. Convert, and your inputs become time-series ready for monthly data entry
For calculations that were already set up with the right tracking metrics in your Value Framework, conversion can be
nearly automatic. The system detects what's already configured and marks those as ready to go.
## How to convert calculations
### Opening the conversion tool
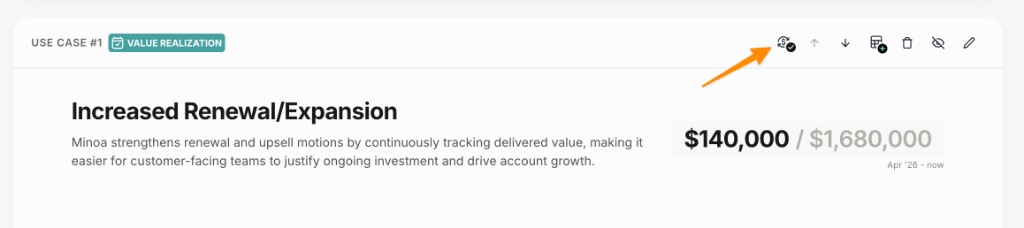
With your Value Realization Scenario active, look for the **conversion icon** in the top-right toolbar of each use case card. This icon indicates that the calculation is ready for conversion (or shows its current conversion status).
Click the conversion icon to open the conversion modal, which shows all calculations and their current status.
### Batch conversion (recommended)
The conversion modal shows all calculations in your Value Realization Scenario and their current status. Each calculation card shows:
* The use case name and calculation
* The suggested improvement metric to track
* Whether it's ready to convert or needs your input
Click the conversion icon in the top-right toolbar of any use case card.
The modal walks you through each calculation. For most, the system has already identified the right metric to
track—you just need to confirm.
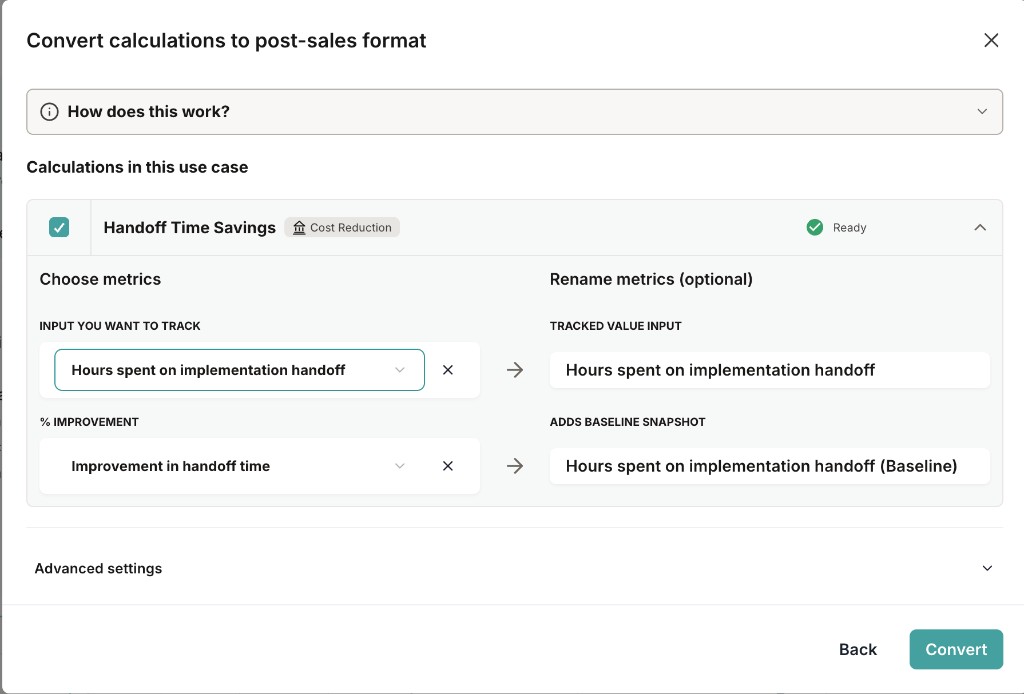
For calculations that need your input, you'll select:
* **Improvement metric** — the value you'll measure each month (e.g., "Avg. Tickets per Day")
* **Reference metric** (for percentage-based calculations) — the projected improvement percentage from the
original business case (e.g., "Expected Efficiency Gain")
Click **Convert** to apply. The system transforms your calculations: percentage-based formulas become absolute
value tracking, and your selected metrics become time-series inputs with monthly columns.
After conversion, your calculations are ready for [monthly measurements](/pages/value-realization/measurements).
You'll see time-series input fields where you can enter values for each month.
## Understanding conversion types
The conversion handles two main calculation structures:
### Percentage-based calculations
These are the most common pre-sales setup. The original calculation uses a projected improvement percentage (like "50% efficiency gain") applied to a baseline metric.
**What the conversion does:**
* Identifies the **baseline metric** (e.g., "Avg. Tickets per Day - Before") — this stays constant
* Identifies the **improvement metric** (e.g., "Avg. Tickets per Day - After") — this becomes a time-series input you update monthly
* Removes the projected percentage and replaces it with a formula that calculates the actual improvement from your measured values
**After conversion:** Enter the actual metric value each month. The system automatically calculates the real percentage improvement and the resulting benefit.
### Absolute value calculations
Some calculations already compare two distinct values without a percentage—like "Current Cost per Unit" vs. "Future Cost per Unit."
**What the conversion does:**
* Identifies which input you'll track over time
* Converts it to a time-series input
* The other value stays fixed as the comparison point
**After conversion:** Enter the measured value each month. Benefit is calculated from the difference between measured and baseline values.
## Calculation status indicators
The conversion tool shows the status of each calculation:
| Status | What it means | What to do |
| --------------------- | ----------------------------------------------------------------------------------- | ----------------------------------------------- |
| **Ready** | Metric selection is pre-configured and the calculation can be converted immediately | Just click Convert |
| **Needs input** | The system needs you to select which metric to track | Choose the improvement metric from the dropdown |
| **Already converted** | This calculation has already been converted to time-series tracking | Nothing — it's ready for measurements |
Calculations that were pre-configured in your Value Framework (with tracking metrics already assigned) will show as
**Ready** — you can convert them in one click.
## Advanced settings
For users who need more control over the conversion, the modal includes advanced options under the **Advanced settings** expandable section:

When converting a percentage-based calculation, you can choose to apply time-series tracking to the improvement
input. This is the default and recommended setting—it creates monthly columns for the metric you'll track.
During conversion, the system automatically renames your calculation inputs to better reflect post-sales
tracking. For example, an input called "Expected Tickets per Day (After)" might become "Measured Tickets per
Day" to reflect that you're now entering actual observed values rather than projections.
These renamed labels appear everywhere the input is referenced: in the calculation view, in the time-series
columns, and in the Value Summary. You don't need to do anything — the renaming happens as part of the
conversion. If you want to adjust a label further, you can edit the input name directly in the calculation after
conversion.
## Reverting a conversion
Made a mistake or need to try a different approach? Conversions are fully reversible.
When you convert a calculation, the system caches a snapshot of the pre-conversion state. To revert:
1. Open the use case card for the converted calculation
2. Click the **revert icon** in the top-right toolbar of the use case card
3. Confirm the revert
4. The calculation returns to its original pre-sales format
Reverting a conversion removes any time-series values you've entered for that calculation. If you've already
recorded several months of measurements, make sure you have that data saved elsewhere before reverting.
## Best practices
If this flow fits your model, running it soon after you create the Value Realization Scenario keeps your
tracking structure ready when data arrives. If conversion is not the right fit, configure tracking another way
instead—there is no requirement to convert first.
If your Value Framework already defines tracking metrics for use cases, the conversion is nearly automatic. Work
with your operations team to set these up in advance.
The improvement metric should be something your customer can easily measure and share with you monthly. Prefer
concrete, observable values over derived calculations.
The conversion is reversible. If you're unsure about the right metric, start with your best guess—you can always
revert and try again.
## Common scenarios
Your Value Framework already has tracking metrics defined for every use case. Open the conversion modal and
click Convert — all calculations show as "Ready" and convert in one step. You're immediately ready to start
recording measurements.
The conversion modal handles both. Pre-configured calculations convert automatically. For the rest, select the
improvement metric from the available inputs and convert.
Each calculation converts independently. You'll select a separate improvement metric for each one. After
conversion, both appear as time-series inputs in the monthly tracking view.
Pick the input that your customer can most easily measure and share. The metric should change as adoption
improves — something like "time per task" or "tickets handled per day" rather than a cost assumption. Remember,
you can always revert and choose differently.
The conversion tool lets you select one metric per calculation. Split the calculation first, then convert each
half:
**Ask the AI Value Engineer** (fastest) — Open the [AI Value Engineer](/pages/business-case/ai-value-engineer) and use this prompt:
```
I need to track two separate metrics for the "[Use Case Name]" use case
in my Value Realization Scenario. Please split the existing calculation
into two separate calculations on the same use case — one that isolates
[first metric, e.g. "average handle time"] and one that isolates
[second metric, e.g. "tickets processed per day"]. Keep all the original
inputs, but divide them so each calculation is driven by a single
trackable metric. Preserve the total benefit across both.
```
**Split manually** — Click the **edit icon** on the use case card, duplicate the calculation, then remove the
irrelevant inputs from each copy so each is driven by a single metric. Convert each one separately.
**Track just one** — If one metric is clearly the primary driver of benefit, choose that one and skip the
split. You're still capturing the most important signal, and you can always split later if you need more
detail.
Calculations converted! Next, learn how to [record measurements](/pages/value-realization/measurements) each month
as data comes in from your customer.